 It predates this blog by over a year, but the carport build was an important part of the 109 re-chassis so probably worth covering.
We’d recently moved house, from somewhere with a double garage to somewhere with a single garage. The 109 (which I bought knowing the chassis was toast) didn’t fit in the garage, and I didn’t much fancy doing a chassis swap on the drive in the middle of winter. A carport seemed the sensible solution – I didn’t want the expense/delay/planning permission etc associated with extending or replacing the garage when I’d never be living there long enough to get the benefit from it.
I hadn’t done much in the way of woodwork before. I’d put up a couple of shelves, that was about it. To be honest, I don’t really like working with wood, but in this case it was the most sensible choice.
I also know very little about designing in wood, and don’t have much interest in learning so I sized the beams using the traditional ‘if it looks strong enough, it probably is’ method.
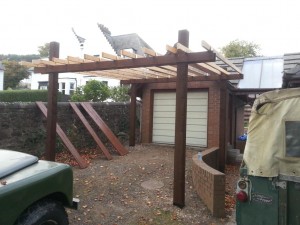
 The uprights are 6″ posts, the bottom 700 mm or so painted with bituminous paint (not the bottom face, to try and stop them trapping water and rotting out). They are sat in 600 mm deep holes with a sand base. Once the posts were level I backfilled with a dry concrete mix and left them a few days to firm up.
Each end has a pair of 6″x2″ beams spanning the width of the carport, these are ~4.4 m long (4.8 m cut down a bit). These are bolted through the uprights with M12 coachbolts.
The longitudinal beams are 4″x2″, 4.8 m long. The ones adjacent to the uprights are coachbolted to the posts with more M12 coachbolts, the rest are attached to the 6″x2″ beams with truss clips. These truss clips were pretty handy, I had planned on making up some brackets to fix the beams on but I spotted these in B&Q and they looked a lot quicker.
 The small beams that the roofing sheets are screwed onto are 1″x2″. They are screwed to the 4″x2″ beam with 2-off 3″ screws at each intersection.
The slope on the roof is a couple of degrees toward the gutter end to match the slope of the ground. The roofing sheets are corolux pvc sheet, think I used 18 sheets of the 600 mm x 3 m. This stuff was irritatingly expensive, but I wanted a clear roof to let light in. My parents’ place has a carport with a steel roof, and it’s horrible to work in as it’s really dark.
I stuck up 6 outdoor spec 5ft striplights for nighttime Land Rover tinkering, and 2 outdoor spec sockets so I don’t need to have an extension lead trailing out of the garage.
It took me about 4 weeks worth of weekends and most evenings to build the carport. It would be quicker doing a second one, a chunk of time was spent on designing it as I went.
I’ve since spent many a rainy day/dark night/rainy and dark night working away in it, so it was time well spent. I suspect the 109 chassis swap would have taken much, much longer without being able to work on it on weekday evenings through the winter.
